This is part six in a series about my $100 Super-Ultralight Gear List. Part six, is all about clothing and the miscellaneous gear that didn't fit into other categories.
Headlamp
Ozark Trail from Wal-Mart | $1.00 | 0.95 oz.
Batteries from Extra Ozark Trail Headlamp | $1.00 | 0.21 oz.
I wouldn't take it spelunking or anything, but this $1 headlamp from Wal-Mart will cover most backpacker's needs. I have even hiked a few miles at night with it.
 I bought two headlamps for my $100 gear list and carry the extra set of batteries just in case they die mid-trip. Buying a second headlamp is cheaper than buying the batteries separately.
I've noticed quite a difference in the brightness from one lamp on the shelf to the next; nearly three times the difference, so I used a light meter app on my cell phone to find the brightest.
If your phone automatically adjusts its screen brightness, it has a light sensor. Just search the app store for "light meter". There are lots of apps to choose from.
Buff Bandanna
DIY Buff, from Thrift Store Material | $1.98 | Worn

 Buffs are an incredibly simple and useful piece of gear. They are skull caps, neckerchiefs, sun block, balaclavas, towels, gaiters, sleep masks, pot holders, and more.
If you haven't used one, they are essentially a stretchy tube of fabric. They run about $20, which is a bit steep considering they are essentially no different than a pair stretchy pant leg. If you've been reading these posts about my $100 super-ultralight gear list, you know where this is going.
Twenty dollars doesn't fit into my $100 budget, so I bought a pair of stretchy lounge pants at a thrift store for $2 and cut off the legs to make two buffs. As ridiculous as it sounds, if you put them side by side with a Buff, I promise nobody will know the difference.
Thermal Layer
Thrift Store Fleece, Cut Into Vest| $1.98 | 5.00 oz.
Even in the summer, it can get chilly at night, at high altitude, or in windy conditions, so I don't like to go out without some kind of thermal layer. I found this fleece at a thrift store for $2. Since a vest is all I need in the summer, I cut off the sleeves to save a couple of ounces.
Towel
 Dollar Store Shammy | $1.00 | 1.16 oz.
 For a camp towel, I use a dollar store shammy that you can find around car wash supplies.
In addition to using it as a towel, it's also great to have when drying clothes. Just put a wet article of clothing on top, roll it up, and squeeze. The shammy will pull most of the water out. To dry it the rest of the way, I use safety pins to attach the clothing to a clothesline or onto my backpack while hiking.
Click here for more information on cleaning clothes in the backcountry.
Safety Pins
For Hanging Wet Clothing on Pack or Clotheslines | $0.00 | 0.04 oz.
Sit Pad
Back Pad Removed from Atka Backpack | $0.00 | 0.56 oz.
This could definitely be considered an unnecessary piece of gear, but I'm always glad I have it. In addition to having a softer and drier place to sit, it's also nice to have on the ground by my hammock, so I can get in and out without getting my socks wet or muddy.
Bug Repellent
DEET Spray, 1 oz (If needed) | $2.99 | Carried
Nothing will ruin a trip like a swarm of mosquitoes. If I expect bugs, I carry one of these in my pocket.
Notebook
DIY Waterproof Notebook | $0.00 | Carried
Also not necessary, but I never go on a hike without a journal. Of course, any small journal will do, but I like to make my own.
Other Clothing

If you're just starting out, you don't need to spend a ton of money on hiking clothes. Any athletic clothing will work just fine, but you'll want clothes that wick moisture and dry quickly, so avoid cotton.
If you don't already have something that will work, you can find lots of options at a thrift store like the clothes above that I found for $2 each.
Shorts | Non-Cotton T-Shirt from Thrift Store | $1.98 | Worn
Shirt | Non-Cotton T-Shirt from Thrift Store | $1.98 | Worn
Socks | Use What You Have, but Non-Cotton Preferred | $0.00 | Worn
Extra Socks | $0.00 | 1.80 oz.
Underwear | Use What You Have, but Non-Cotton Preferred | $0.00 | Worn
Extra Underwear | $0.00 | 2.787 oz.
Rain Poncho (If Needed) | Frogg Togg Poncho | $4.99 | 3.99 oz.
Shoes | Start out just using what you have. Any comfortable running shoes, trainers, or tennis shoes will work fine | $0.00 | Worn
Please email any questions or comments to ryan@abackpackerslife.com. If you have an alternative idea for a super-ultralight, super-ultracheap gear list, let me know. I would love to share them in future posts.
This is part five in a series about my $100 Super-Ultralight Gear List. Part five, is all about my first aid and gear repair kit.
First Aid Kit
Gauze Roll, Duct Tape, Antibiotic Ointment, and Meds | Cost $3.00 | Weight 1.241 oz.
This first aid kit is very minimal, but you can do a lot with a roll of gauze and some duct tape:
Duct Tape Band-Aids in Any Size

With a roll of gauze and duct tape, you can make bandages in any size and shape you need.
I keep duct tape either wrapped around pen ink or on my hiking poles, so it's always carried and doesn't contribute to pack weight.
Duct Tape Butterfly Bandages
Keep an open would closed until you can get to the nearest hospital with a duct tape butterfly bandage.
Wound and Eye Wash

Clean a wound or flush debris from your eye by poking a hole in a plastic bags and filling with clean water.
Duct Tape Tick Remover
Remove ticks by folding over a piece of duct tape like tweezers and pulling them straight out. Disinfect the area with hand sanitizer. Contact a doctor immediately if you have signs of infection, rash, or flu-like symptoms, as ticks can transmit lyme disease.
Duct Tape Splinter Remover
Whether it's a tick or a splinter, duct tape can be used in place of tweezers.
Duct Tape for Hotspots

When you feel a hot spot starting, cover the area with duct tape immediately to prevent additional friction. Make sure the duct tape doesn't stick to a blister by sticking another smaller piece on the back
Duct Tape Splint
If you need to immobilize a broken bone, it's duct tape to the rescue once again.
Single-use Antibiotic Ointment

I've never needed more than a couple applications of antibiotic ointment on a trip, so rather than take a full tube, I seal a single-use amount in pieces of straw and fuse the edges with needle nose pliers and a lighter. They can be reopened by cutting a corner off one end, or reapplying heat.
Other Items
Toothpaste, Toothbrush, Toilet Paper, and Sewing Kit | Cost $1.00 | Weight 1.257 oz.
I use the brush half of a travel toothbrush. My sewing kit is a sewing needle and some dental floss. Dental floss is stronger than thread and it can, of course, be used on your teeth. I keep the needle and razor blade in a plastic condiment cup with lid, to keep it from poking a hole in something or getting lost.
Duct Tape for Gear Repair
This is part four in a series about my $100 Super-Ultralight Gear List. Part four, is all about my cooking gear, DIY alcohol stove, and water treatment.
Stove
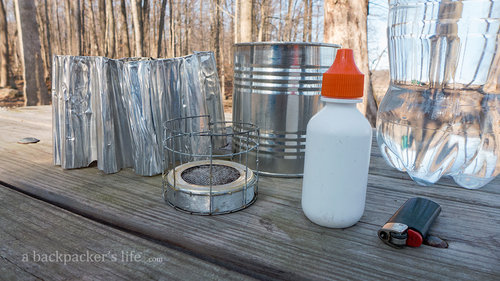
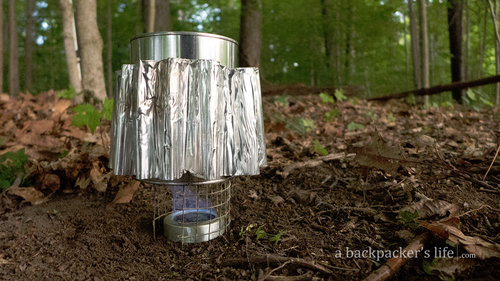
Soda Can Alcohol Stove w/ windscreen and pot stand | Cost $0.00 | Weight 1.411 oz.
 Going super-ultralight doesn't mean you have to give up hot foods and coffee. This setup costs next to nothing and is super-ultralight.
There are a number of ways to make an alcohol stove, but this design has some advantages. Wicking stoves don't need to be primed, the burning fuel can't spill if tipped over, it's very easy to make, there is zero risk of explosion like a pressurized stove, and in ideal conditions, it will boil 2 cups of water with 1/2 to 1 ounce of fuel in about 7 minutes. A more efficient design may be able to boil water a couple minutes faster, but honestly I've never found myself that close to starvation. Click here for detailed instructions on how to make your own.
 I made this wind screen out of an aluminum foil pan. The accordion skirting shape hugs the pot while allowing heat to travel up the sides and allows plenty of oxygen for the flame. Just fill the stove with 1/2 to 1 oz of fuel, set the pot and windscreen on top, light, and then slide the windscreen down to cook.
Cook Pot
Steel Coffee Can | Cost $0.00 | Weight 2.36 oz.
This recycled can weighs in at less than my titanium cook pot, but not just any recycled can will do. Most cans are lined with a chemical not intended to be subjected to high heat. At high temperatures, these can leach potentially harmful metals or BPA into your food. Thankfully, many steel coffee cans are unlined, such as the "Chock Full o'Nuts" brand coffee can I used.
Most can liners have a gold-ish tint, but some are not as easy to see. A multi-meter can be used to be sure your can is unlined. Electrical current doesn't pass through the can lining, so if it is unlined, you won't detect any resistance.
Steel will rust. Although it is not dangerous to ingest, you can prevent it by drying it out after each use. Save all those moisture-absorbing desiccant packets from medicine bottles, dehydrated foods, etc. to put inside the pot when storing.
Pot Insulators
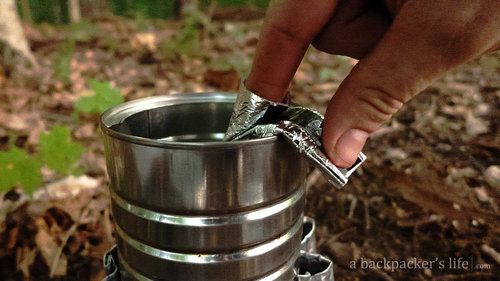
DIY Pot Cozy w/ Finger Mit | Cost $1.00 | Weight 0.282 oz.
 After cooking, the steel can will be too hot to touch. In lieu of a pot handle, I made a pot insulator and a "finger mit" out of a car windshield shade I purchased at a dollar store.
The pot insulator will also help keep your food and coffee hot.
Fuel
HEET in eye dropper | Cost $1.59 | Weight of bottle 0.494 oz

Although denatured alcohol burns slightly hotter, HEET gas line anti-freeze is a great alternative. It burns just as cleanly, it's cheaper, and it's available in most gas stations and any other store that sells automotive supplies.
It comes in a 12-ounce bottle, but if that is more than you need, you can safely transport it in a smaller plastic bottle, such as an eye dropper bottle or soda bottle. If using a soda bottle, add a drop of food coloring, so you don't accidentally drink it! Use a color that is unlike anything you might drink.
Make sure to get the yellow bottle of HEET, the IsoHEET product in the red bottle is highly flammable and can actually explode.
Spoon
Heavy Duty Plastic Spoon | $0.57 | Weight 0.28 oz.
Any plastic spoon will do, but I prefer something heavy-duty. You can find thicker plastic utensils in Wal-mart or any store that sells outdoor sporting goods.
Lighter
Mini Bic in Small ZipLoc | $1.00 | Weight 0.388 oz.
For a backup, I also carry a small ziploc baggie full of wooden matches. Their heads are dipped in candle wax to waterproof them.
Food Bag
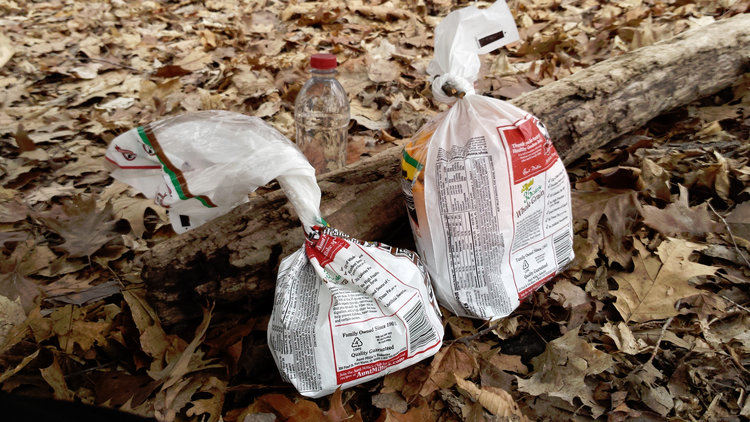
DIY Window Shrink Film bag | $0.00 | Weight 0.14 oz.
See my previous post on how to make bags out of window shrink wrap film. Recycled bread bags also work great. Why spend money on anything else?
Water Treatment
Bleach in breath drop bottle | $0.00 | Weight 0.25 oz.
Believe it or not, household bleach is an excellent safe water treatment in the backcountry. This small "breath drops" bottle of bleach will treat 7 gallons of water. Just use one drop per 16 oz. of water and let sit for 30 minutes. Click here for more details.
The black duct tape sleeve in the photo is to block UV light. It's probably not necessary for a week or two on a trail, but UV will degrade the shelf-life of bleach over time. Click here for more information including detailed instructions.
Water Storage
Recycled 16 oz. Soda Bottle | Cost $0.00 | Weight 0.81 oz.
Recycled 2 liter Soda Bottle | Cost $0.00 | Weight 1.728 oz.
Rather than spend money on various water containers, I carry plastic soda or water bottles. They are plenty durable, free, and otherwise destined for a landfill. I carry at least two, so I can lose or break a bottle and still have a way to transport water. A hiker with a dog came to my shelter on the Long Trail in Vermont, and the dog decided one of my water bottles was a fun chew toy. I'm glad I had a backup.
My second bottle is a 2-liter soda bottle, so I can have plenty of water at camp or when water sources are sparse.
Next Monday's Post: My gear for first aid and gear repair.
Please send me your questions or comments. If you have an alternative idea for a super-ultralight, super-ultracheap gear list, let me know. I would like to share them in future posts.
I bought two headlamps for my $100 gear list and carry the extra set of batteries just in case they die mid-trip. Buying a second headlamp is cheaper than buying the batteries separately.
Buffs are an incredibly simple and useful piece of gear. They are skull caps, neckerchiefs, sun block, balaclavas, towels, gaiters, sleep masks, pot holders, and more.
Dollar Store Shammy | $1.00 | 1.16 oz.
For a camp towel, I use a dollar store shammy that you can find around car wash supplies.


